This guide was written to assist you to purchase the correct elements to build a draft beer system for a bar, please consult with a professional installer to assist with your set-up.
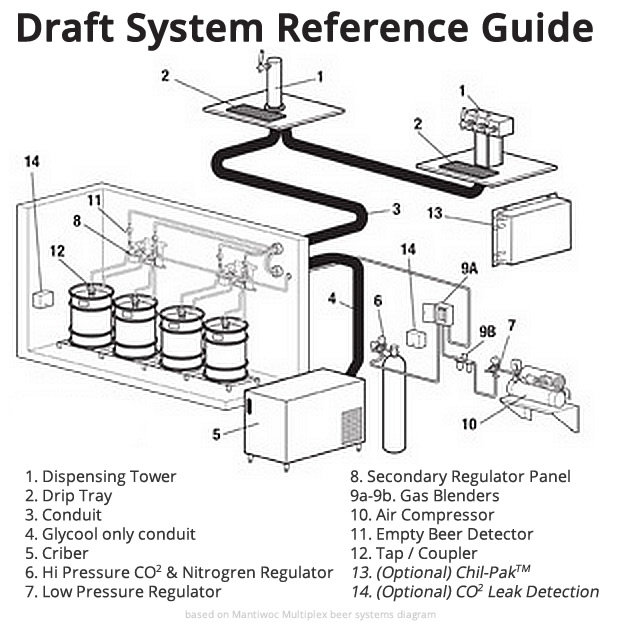
Use the diagram and reference numbers in the steps below to help you configure a draft beer system. Depending on your situation, there are multiple methods of configuration to design a high quality draft beer dispensing system.
Step 1 - Verify beer requirements
Obtain answers to the following questions about your draft beer system.
- How many flavors to be poured?
- Any special flavors such as Irish Stouts?
- How many towers are to be installed?
- How many faucets on each tower?
- Dispensing tower location(s).
- Location of the keg cooler.
Step 2 - Select dispensing set-up
Select a tower (ref. 1) and drip tray (ref. 2) based on determined need and desired style.
Drip tray should be larger than the tower to reduce spillage when pouring pitchers. Match drip tray and dispensing tower color and material finish for the best countertop appearance.
Step 3 - Choose appropriate conduit required for application (ref. 3)
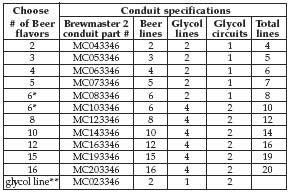
Conduit contains beer and glycol lines wrapped together. Depending on distance and quantities of flavors, the required conduit will contain 2 or 4 glycol lines to keep the beer chilled. Glycol is circulated from the chiller to the dispensing tower and back in a closed loop system. Conduit is available in 2 quality levels. Brewmaster 2 conduit features beer lines that offer superior cleanability. Use the chart below for different conduit options to determine your proper conduit line set.
Conduit Specification Chart
Step 4 through 6 - Calculate required conduit length
Calculate the required conduit length by adding together the following:
- Feet Between Cooler & Beer Tower
- Feet Between Towers (Optional) -Add together distance between all towers present in your system
- Feet from Conduit Entry Point to the furthest keg in the cooler
- Distance of any run needed to connect the system
We recommending adding an extra 5% of conduit length to any distance measured to accound for mismeasurement, mishandling, and unplanned distance.
Step 6 - Select appropriate Multiplex chiller model (ref. 5)
The length of the conduit line and the quantity of flavors determines the required chiller you will need. For 6 or more flavors at least 2 glycol circuits are required. One circulation pump is required for each glycol circuit.
Multiplex Chiller Model Selection Chart

Step 7 - Add appropriate glycol kit for the chiller model selected
Mixture is 25% glycol and 75% water with a recommended 18-month life.
Select a Glycol Kit to correspond with your chiller.
Step 8 - Determine how you are going to transfer the beer
Beer can be transferred through the system using compressed gas or by pump.
Common transfer systems to consider are:
- CO2 / Air Draft Beer System
-
Available, but not recommended due to faster beer degradation.
- Requires:
- 2 source
- Primary regulators (ref. 6) or low-pressure regulator (ref. 7) if soda system CO2 is available
- Secondary regulators (ref. 8) one per keg
- Blender with air filter (ref. 9a & 9b)
- Air compressor (ref. 10)
- One tavern head per keg (ref. 12).
- Straight CO2 Draft Beer System
-
Suitable when conduit runs less than 60 feet.
- Requires:
- CO2 source
- One primary regulator (ref. 6) or low-pressure regulator (ref. 7) if soda system CO2 is available
- Secondary regulators (ref. 8) one per keg
- One tavern head per keg (ref. 12)
- Aligal Transfer System
-
"Beer gas": pre-blended CO2 / N2 (carbon dioxide/nitrogen)
- Requires:
- Pre-blended Aligal - CO2 / N2 source
- One primary regulator (ref. 6) for Aligal tank
- Secondary regulators (ref. 8) one per keg
- One tavern head per keg (ref. 12)
- CO2 / N2 Draft Beer System
-
Requires blender installation to create "Beer gas."
- Requires:
- Separate N2 and CO2 tank sources
- Primary regulators (ref. 6) for CO2 low-pressure regulator (ref. 7) if soda system CO2 is available
- Nitrogen primary regulator (ref. 6) (219381) and nitrogen tank adaptor (204859) see pages 16 - 17
- Secondary regulators (ref. 8) one per keg
- CO2/Nitrogen Blender (ref. 9) with one or two outlets, depending if Guinness/Bass is used
- One tavern head per keg (ref. 12)
- Beer Pumps
-
Pre-assembled beer pump panels are available that include most of the required components listed below.
- Requires:
- One primary regulator (ref. 6) or low-pressure regulator (ref. 7) if soda system CO2 is available
- Secondary regulators: one to operate all the pumps, and one per every 3 kegs to pressurize kegs.
- Pumps - one per keg required.
- Empty beer detectors (ref. 11) - one per keg required.
- Tavern head (ref. 12) – one per keg required.
Step 9- Complete Your System
There may still be accessories and equipment needed, depending on manufacturer and the exact system you have planned.
- Other accessories may include:
- Empty beer detectors to be used with gas methods.
- Wall hanging kit for glycol chiller model 75 & model 150.
- Tools, filter kits, individual tubing lines for gas and beer.
- Keep kegs cold with a Walk-in Cooler.
- Ice Machines.
Now you can enjoy your new draft beer system!